Energy Efficient Housing: Design a Passive Solar Home
Our driving question/request for this project was, How can we design a home that is comfortable in all conditions without the use of electricity? What is the most efficient way to heat and cool a home? Following project criteria, we were to research and ultimately come up with our own energy efficient house design. Then, along with all the other STEM groups, we presented our ideas to a panel of community, school, and contractor judges to determine which one design would be built. Once that was decided, as a complete STEM class, we came together to build the structure. Thanks to PG&E, who generously gave us a sponsorship for this big project, we had a $5,000 budget to work with in order to make this passive solar home come to life in our own school campus. It was an ambitious project for our class and took lots of perseverance and dedication, but it was an extremely insightful experience!
Project Outline:
- Design a hot water heater: Following instructions, we created passive solar water heaters by using cardboard, aluminum foil, copper tubing, plastic tubing, plastic wrap, paint, and water. We basically built a cardboard box with the bottom painted black to absorb all the heat; the sides were covered in aluminum foil to reflect as much light and heat as possible back to the floor. We had plastic wrap over the top of the box to act as a makeshift "greenhouse" layer to trap all heat inside. The copper tubing was set on top of the black so that heat could transfer into it, and then into the water that was running through the tubes. We then connected the tubes to a bottle of water that we stuck in another cardboard box, stuffed with insulation. We let the water run and kept re-filling the water bottle. Theoretically, the water was supposed to slowly heat; however, since we had a morning class and had little sunlight, our water heaters barely raised the temperature two degrees. The mini-project was still extremely valuable because it showed us the concept of how different colors have different heat-retaining capacities.
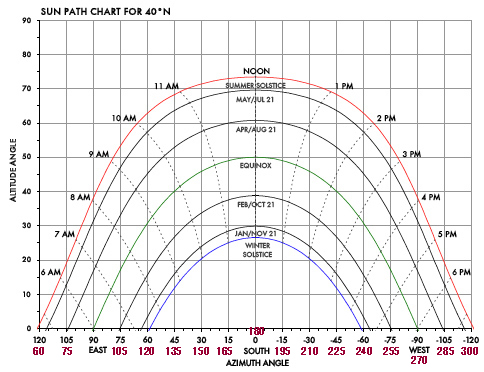
- Solar angles and how it changes during seasons: Since the Earth is tilted on an axis of 23.5 degrees and is constantly moving around the Sun, we experience seasons. Solar angles are important to us because using them, we can detect the directness of the sun's rays at a given time. In the winter, we (in California, or the Northern hemisphere in general) get more slanted rays because the Sun is more present over the Southern hemisphere. Since the rays are slanted, less of those rays can fit into a given area, therefore simulating less heat. This also explains why the sun is most active at midday -- when it's directly overhead.
- Daylighting Design Activity: There are multitudes of ways to maximize and utilize lighting, no matter what time of year it is. We see architects putting these techniques to use all the time. I myself found that on the ride to school, I could pick out at least two different daylighting techniques being utilized in each house.
- We learned that skylights and clerestory windows were very efficient in letting light in. However, we realized that skylights also allowed for lots of heat to escape. The main thing that we took from this lab was that having a slanted roof maximized the amount of light and heat it was able to acquire.
- Below are the many daylighting techniques that could be used in a house:
1. Light Shelves - used to bounce light from the overhang on the sill, back into the room's ceiling which then reflects/diffuses light throughout the room
2. Skylights - a glazed opening in a roof to admit light
3. Solar Tubes - opening lets in light, which bounces down reflective lining and into room
4. Clerestory Windows - windows situated up high, not for view, but to catch sun rays that come in at higher angles
2. Skylights - a glazed opening in a roof to admit light
3. Solar Tubes - opening lets in light, which bounces down reflective lining and into room
4. Clerestory Windows - windows situated up high, not for view, but to catch sun rays that come in at higher angles
- Site Selection: Our group scouted out many different locations for our passive solar house. In the end, we decided with the flat area by the stadium bleachers because it was level, solid ground, got lots of direct sunlight at all hours, was visible to community, had no trees to block sun, was highly accessible, near a bathroom, and was a convenient location for its purpose. We also took into consideration that it was not right by a street to ensure visibility from the public. This being said, San Marin's football team is extremely supported by the community and since our location is just by the bleachers, this will bring our building to the public eye.

Site Location: just by the stadium bleachers
- Materials Testing: In order to see which materials were best for retaining and/or reflecting heat, we designed a detailed experiment and took meticulous data, and graphed the points out. We tested every material that we thought was feasible and accessible. [Items in bold retained heat well, while items without bold reflected heat instead.]
- Flooring - carpet, bamboo, linoleum, hardwood, ceramic, cork
- Insulation - coconut fiber, foam, fiberglass matting
- Exterior Walls - stucco, redwood, brick, plastic PVC siding
- Interior Walls - textured & flat drywall (black/white), rock
- Roof - shingles, turf/sod, tin, tar, skylight
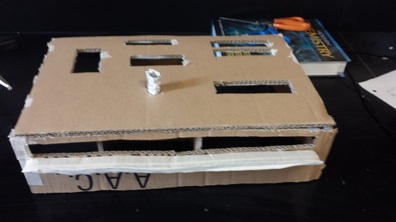
- Building Design: This step was the bulk of our project, where we were asked to research into depth, and come out with our own designs for a passive solar house. The model that we made was physical and tangible: we used popsicle sticks to show the wood framing that would take place on two of the walls, and then used cardboard to simulate how the drywall would look. We painted the interior of our model house white, so it would reflect light. We included the rest of the criteria, which is written below, in a Powerpoint presentation. Please take a look at the attached slides; they go into more detail about blueprints, and the green roof that we decided to utilize in our passive house design.
- Key features of our design, and how they help with energy efficiency
- The materials we selected, and why we chose them
- Budget list complete with material names, quantities, cost estimates, and source links
- Blueprints drawn to-scale for all surfaces
- A scale model of our structure, built using representative materials at around 1/10 size
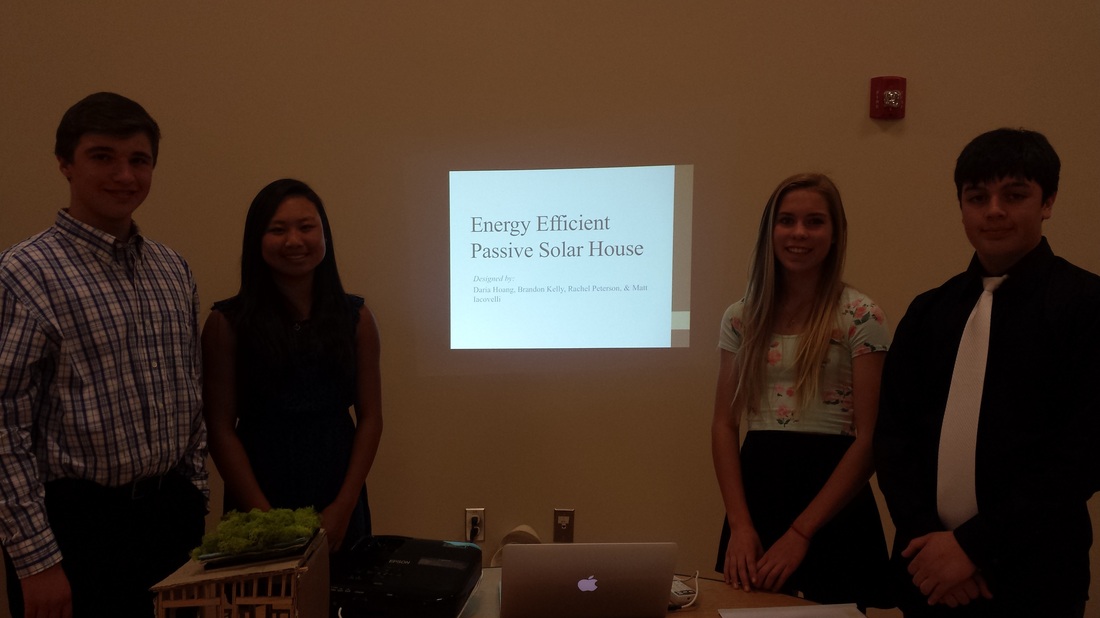
Matt Iacovelli, Daria Hoang, Rachel Peterson, & Brandon Kelly @ presentation night
- Communication: On March 12th, 2014, we presented and communicated our house design using the above Powerpoint, our model, and hardcopy blueprints and budgets. It was a wonderful learning experience; we had to be professional, talk above noise levels, maintain audience interest, and it was a great opportunity to show the improvement in our public speaking since the earlier projects. It was really humbling to see and look at everyone else's presentations; in each, there was something creative and unique.
- Results: There were really great results that came out of the presentation night. Our design and presentation made it into the "top three" choices of the judges, but wasn't picked to be built full-scale. Although the green roof was a cool idea, it is in fact a slightly complicated structure, and the contractors felt it would be a little difficult for the STEM students to build, considering that most of us have never done such hardcore construction. On top of that, the green roof has a little bit of maintenance involved, and as a school building, it would be hard to maintain the green roof's general being over the course of year, especially during the summer. However, I was really ecstatic to hear that the judges loved the design and research behind the green roof.
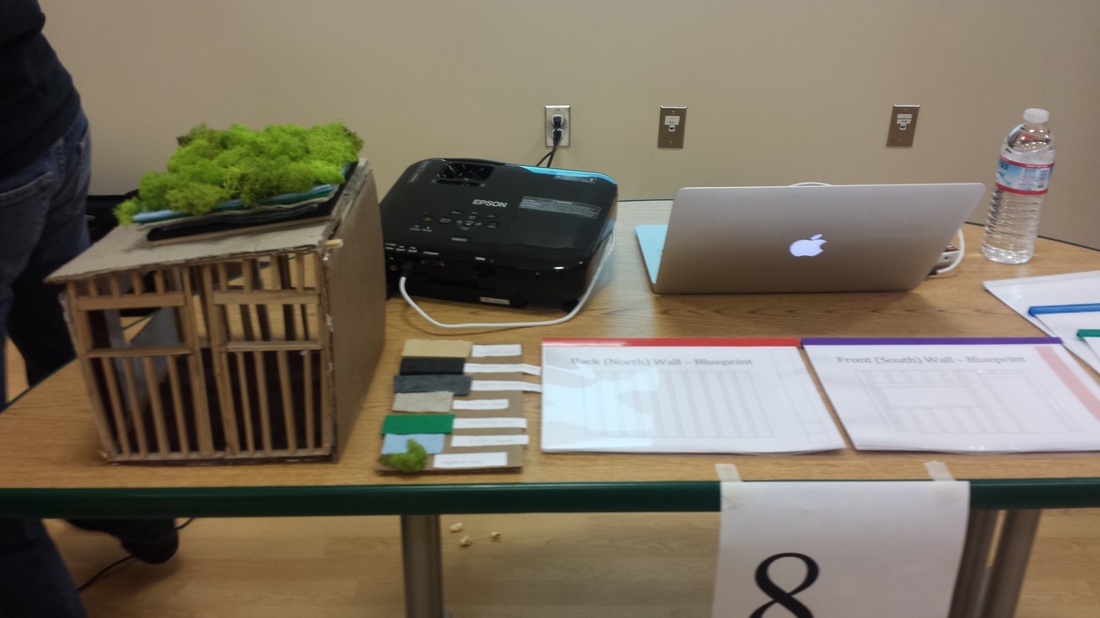
Our presentation table: (L - R) Model, green roof layers, blueprint hardcopies, budget hardcopies. We used a black projector to project our Powerpoint onto the wall
|
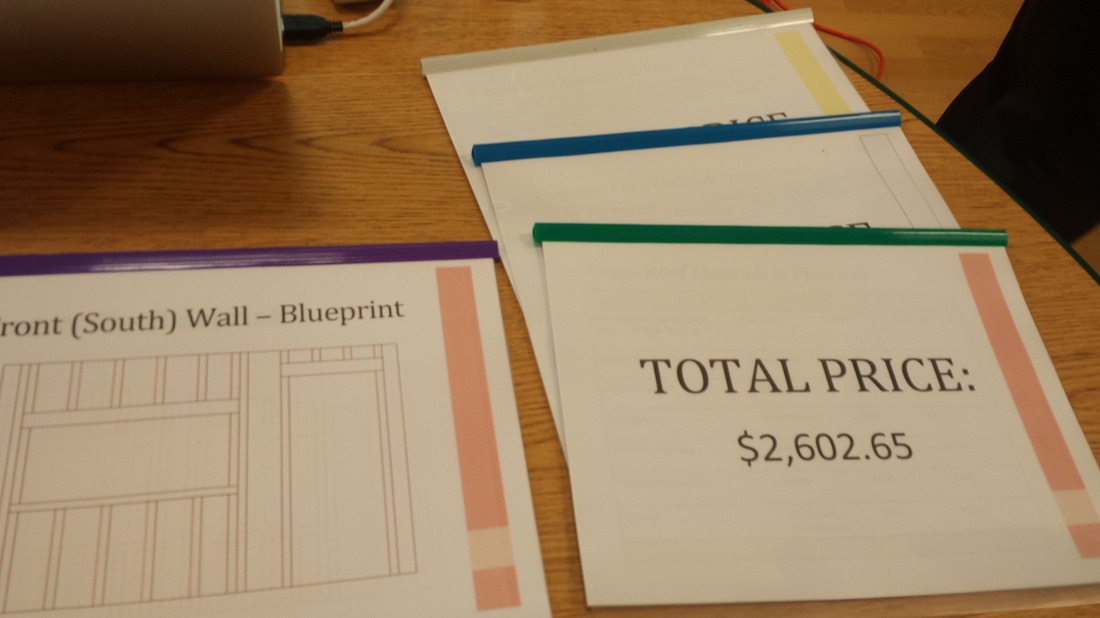
Closer look at the blueprint and budget hardcopies
|
- Final Building: After choosing the ideal design to build, our entire STEM class ordered materials and dedicated weekend shifts in order to make our model into the real thing. First, we took measurements at the building site and dug four square-shaped holes, each a foot deep, into the ground. We mixed cement with water and poured the strong mix into those holes, creating the deck piers needed to support the structure. I learned that the amount of water is a crucial factor in the cement's strength and durability. Too much water will make the cement weak, because once the water evaporates, it will leave too many air pockets. Too little water, and the cement won't become the sticky substance it needs to become in order to harden. The next major step was to lay out the basic floor structure. We used a level laser in order to ensure it wasn't sloped, then nailed in the wood frames and the plywood sub-flooring on top of that. I learned that you have to use glue to put the flooring together, as well as nails, because the adhesive will keep the floor from creaking. With help from our head constructors, we nailed together the wall frames, being careful to ensure that the window headers, sills, king studs, and cripple studs were carefully included. We nailed these wood frames on the ground, to take out potential struggle with gravity and ladders in general. In doing so, we were able to make the framing accurate and relatively flat and straight. The constructers helped complete the roof for us; meanwhile, we primed the plywood for the walls and used ladders to prime the ceiling as well.
The slideshow below shows the progress of our STEM building in chronological order.
- Justification: Creating an efficient home off the grid has plenty of pros, and like anything in life, also has cons. An efficient home is generally more expensive to install initially, but has much less cost afterwards. However, it's not completely reliable because wind power, for example, only occurs when it is windy. Likewise, having a non-energy efficient house is really hard to support economically. Electricity and heating bills can become extremely expensive, considering how many times the average household turns on the lights each day. So as a class, we researched the justifications of a passive solar home and created a Google Doc with all the information, attached below, to follow up the question: Is it worth it?
- Generation of Electricity: The final part of this project was designing a wind turbine to, theoretically, generate electricity for our structure. To do this, we built wind turbines out of manila folders, wooden frames, and axises. We tested different designs in front of a fan to simulate the wind. After much tweaking, we improved our first design, which gave off 0.16 energy, all the way to 2.01. Our final wind turbine generated enough energy to power Christmas tree lights.
- Physics Concepts: Throughout our three month-long project, we looked into many different physics concepts in order to fully understand the meaning and importance of energy efficiency. We took detailed notes on heat & thermodynamics, fluids, gases, and more.
- Conduction - transfer of heat through a material (i.e. when a pot conducts heat from the stove to the food)
- Convection - transfer of heat through a fluid (i.e. convection currents in the ocean or in the earth's core)
- Radiation - energy transmitted as rays, waves, or particles (i.e. energy from the sun)
- Heat - a form of energy (Q)
- Thermal Conductivity - Heat travels from places of lower pressure to higher pressure, or from hot places to colder places. This is why "coldness" is simply the absence of heat. The reason why your hand feels cold after touching ice is because the heat has left your hand and traveled into the ice, melting it. However, touching carpet doesn't have the same effect because it is not a good conductor, and therefore doesn't take as much heat from your hand.
- Fluids - a substance, liquid or gas, that is capable of flowing and that changes its shape to fit its container
- Pressure - the exertion of force upon a surface by an object, fluid, etc. Pressure is Force / Area, and directly correlates to depth. The deeper you go, the more pressure there is. Every 10.3 meters downward, there is half less air, and it doesn't matter where you are. If you're at the bottom of a 10.3 meter pool in Hawaii, you are under the same amount of pressure as a person 10.3 meters underneath the Mediterranean Sea.
- Archimedes' Principle - "An immersed object is buoyed up by a force equal to the weight of the fluid it displaces." This principle that Archimedes came up with is still used today whenever we think about object displacement.
- Buoyancy - ability to float or rise in a fluid. An object must have a density less than the fluid it's in if it wants to have any chance of floating. Water, for example, has a density of 1. Anything with less density than 1 therefore floats -- like a cork, or rubber duck. Objects with a density greater than one, like a rock, immediately sink. However, there are ways to bypass this law, and that is by filling the said object with lots of air. That's how ships float; they have lots of air pockets in order to keep the ship afloat. The reason why ships sink is that when there is a hole, water fills those air pockets; once that air is gone, the density will go up and the ship will lose all of its buoyancy.
- Gases - a substance possessing perfect molecular mobility and the property of indefinite expansion, as opposed to a solid or liquid. Gases make up the air around us, which is measured by an instrument called a barometer. Gases have high molecular action, and therefore gases with higher temperatures have lower pressure because the same atoms are just taking up more space, and therefore aren't as rigid and able to bear down pressure.
- Boyle's Law - the principle that pressure and volume of a gas have an inverse relationship. It describes how the pressure of gas tends to decrease as the volume of a gas increases.
- Ideal Gas Law - Pressure x Volume = # of atoms x constant x temperature (P V = n R T )
- Bernoulli's Principle - In fluid dynamics, Bernoulli's principle states that for a flow, and increase in the speed of the fluid occurs simultaneously with a decrease in pressure or a decrease in the fluid's potential energy.
- Laws of Thermodynamics - There are four main laws of thermodynamics; the 0th, 1st, 2nd, and 3rd. The 0th law explains temperature, and states that if two systems are in thermal equilibrium with a third system, they are also in equilibrium with each other. (Transitive Property: if a = b, b = c, then a = c.) The 1st law explains conservation of energy, stating that energy is neither created nor destroyed, and that heat is a form of energy. The 2nd law is about how entropy increases; as time passes, energy gets more and more "messy and unstable." For example, the sun gives of significant quantities of energy, but as it does so, it becomes more unstable until it will eventually explode. The 3rd law simply states that temperature can never get down to absolute zero. The idea of absolutely no molecular action is merely theoretical, as heat always exists, even if it's very very slight.
- Specific Heat - a physical property of matter that states the heat capacity of a certain object. Objects with higher numbers take longer to heat up, but also take longer to cool down. Objects with low specific heat capacities heat up quickly, but also lose that heat relatively fast as well. Water is an example of a fluid with a particularly high specific heat of 1. This explains why we use water to cook. It heats up after a while and keeps that temperature for a long enough time to cook through our food. It also explains why coastal cities have milder winters; San Francisco, for example, has a warmer winter than a place like Sacramento, or Reno. This is because the heat from the summer is still somewhat retained in the water surrounding the city and keeps the area from freezing over.
- Conversion of Temperature - Fahrenheit = Celsius x (9/5) + 32. Celsius = (5/9) (Fahrenheit - 32)
- Reflection: This project was by far the longest that we've done, having lasted for three months and still going, but I definitely learned so much. First off, I realized how much work architectural design is. I never really knew how much thought, care, and detail that architects and contractors have to give. Just doing one blueprint requires so many little details, and it's not a matter where if there's a mistake, you can let it go. Everything has to be perfect in order for the construction to work, and even doing the materials budget was really time-consuming. I don't know how many times we found something missing in our budget: first, it was the windows, and then it was the support beams on the roof, and the screws and nails needed to construct the house. It wasn't always fun to have to scroll through Home Depot catalogs, jotting down all the prices, but it was definitely a good test of patience and perseverance. There were a couple challenges that I found during this project. First, it was a particularly long project so, at times, it was difficult to maintain the same enthusiasm. Another thing that I came to reflect upon during this project was perfectionism. I've always been somewhat of a perfectionist. I draw all of my lines with a straightedge; I can't stand messy notes, so I always take the time to write neatly and legibly. Naturally, this perspective of mine bleeds into other events in my life. I found myself disagreeing with my group a couple times because I wanted our work to be neater and more professional (an almost OCD request, I admit), whereas my group didn't see the need. But despite some of the differences in viewpoint that my group mates and I had, I still feel that we did a great job completing such a complicated, intimidating project. We didn't give up when some of the workloads got heavy, and I felt that we had a really creative design. By utilizing the green roof, we really set ourselves apart from other groups, even if that fact resulted in extra research. The whole project felt like such a realistic replica of a project that a real constructor or architect would have to do, and I really loved how this project gave me so much insight on that field of work.
